Frame-A-Face for macOS
Online Help Pages
- Frame-A-Face Interface
- Original Image Preview
- Menu Frame-A-Face
- Menu File
- Menu Presets
- Menu View
- Menu Help
- Crop Setup Panel
- Edit Presets Menu
- Presets In Details
- Workflow Automation
- Settings
- Register Program
- Customised Workflow
Settings
Frame-A-Face is designed to work with portrait photos featuring one person per photo. If the program detects more than one face in a photo, it treats this as a problem, and images with multiple faces are marked with red bars.
When exporting these images, you can select one of three options in the preferences panel:

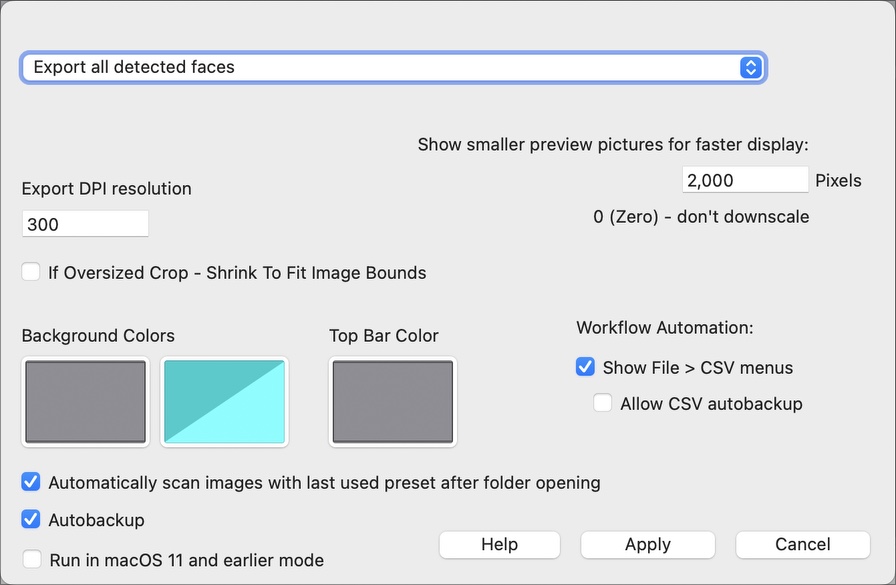
Export all detected faces - This is the default option. Image names for additional crops are appended with suffixes like -x2, -x3, and so on.
Export one face per photo. Alert when more than one face is detected - When this option is active, the program displays an alert message: There are un-reviewed images in the job. The program then opens the next problematic image and waits for you to correct it. You must select the face you want to export.
Export one face per photo. Omit photos with zero or multiple faces - When this option is active, the program exports only “good” photos with one person per photo.
Show smaller preview pictures for faster display - Usually, you won’t need this option, but if your computer is not fast enough or your images are too large, you can speed up the program by selecting to downscale images for preview. Setting it to about 1,500 or 2,000 pixels will result in much faster opening when you click on an image in the list. Note that this downsizing is for preview only. When the program exports images, it opens and crops the full-sized pictures.
Export DPI resolution - Set the DPI value for exported files here.
If Oversized Crop - Shrink To Fit Image Bounds - The program automatically calculates crop borders based on the face size and position. It can happen that the face in the photo is too large or located close to the image edge. In this case, the automatic crop box may be larger than the image itself.
If you select Shrink To Fit - the cropping box will be resized to fit within the image bounds, keeping the face centered as required by the preset.
If this option is not checked, the program will expand the cropping border outside the image. The outside areas are filled with the color of the top-right point of the cropped rectangle. If your models are shot against a plain color background (like a green screen for future background removal), you’ll get quite good results suitable for further work. Otherwise, you may want to enable this option to avoid visible color margins.
See Presets In Details - Oversize for more info.
Background Colors - Set the color for the background under original and cropped images.
Top Bar Color - Set the color of the bar at the top of the program window where detected faces are displayed.
Automatically scan images with the last used preset after folder opening - By default, the program starts the face detection procedure and creates crop previews using the default or last used preset. You can change this setting to make the program wait for you to manually select the desired preset after opening a folder with files.
Autobackup - The program saves information about opened files, detected face positions, and cropped areas, including manually adjusted crops, into an autosave subfolder located in the currently opened folder. When you work with this folder again, the program automatically loads this information (instead of re-scanning individual images) and instantly restores all faces detected and cropping boxes positioned as they were in the last working session.
NOTE: There is no issue if you manually delete the autosave subfolder to save disk space. In this case, the program will treat the folder as new and unprocessed. The same will happen if you disable the Autobackup feature.
Run in macOS 11 and earlier mode - The minimum version of macOS required to run the program with basic functionality is macOS 10.13. However, to use all the program’s features, you need macOS 12 or later. This checkbox is automatically enabled if you are using macOS 11 or earlier, and you can enable it manually if you wish to run the program in an outdated mode for some reason.
Workflow Automation - For details see Workflow Automation help topic.
Show File > CSV menus – Enable this option to add CSV Lists items to the File menu.